Get the H Band App to Set Up Your Device


Please use Your Smart Phone to search “H Band” and download from the App store.(Smartphone only, not for PC).If you have trouble downloading the H Band App, please feel free to CONTACT OUR SUPPORT TEAM.
GET STARTED
1.Remove the band
Pull open the strap in 45 degrees and take out the tracker’s body.(Don’t pull horizontally).

2.Charging the battery
Insert the chip-mounted end of the tracker body into the USB interface to activate the tracker through charging.
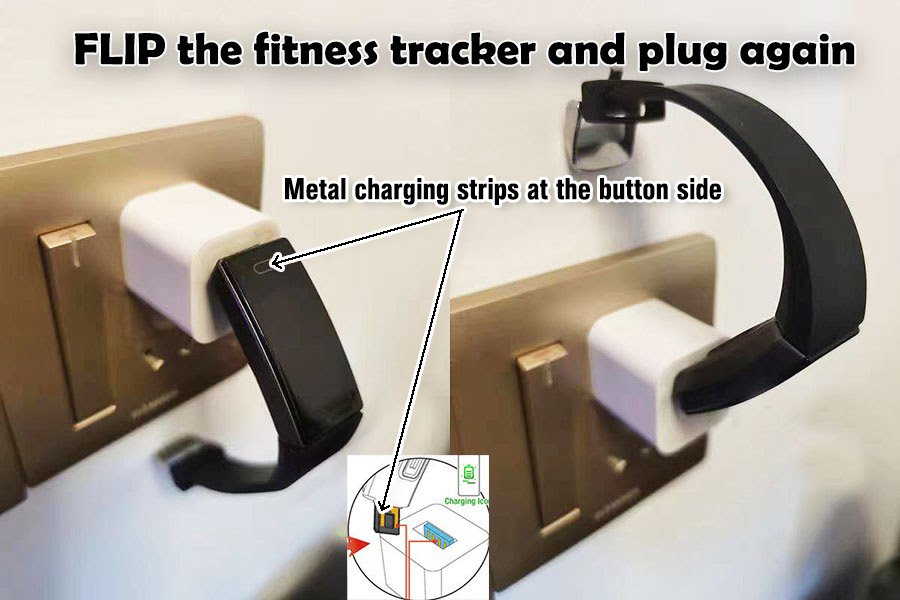
A charging icon will appear on the screen when plugged it to a power supply indicating that your tracker is charging correctly(If not, FLIP it and plug again). After charging is completed, LONG PRESS (3 seconds) the Function Key at the bottom of screen to turn on your tracker.

It takes around 1 hour to fully charge the tracker. A full charge will give working time for 5-7 days under normal condition.
No specific charger or messy cable is required. You can charge the fitness tracker with either:
- Any phone or tablet power adapter
- USB port on PC or power bank
- Wall charger or power strip with USB port
If there is a charging problem, please provide your order number and send us a short video showing the problem(mailto: info@zururu.com):1. Charge your device (the charging strips inside the USB port can be seen), 2. Long press the control button. We’ll send you a new replacement.
1) Check if you have inserted the correct end ino the USB port
2) Check if the gold coloured charging strips on the tracker are facing towards the contacts in the USB port, if not, flip and plug it in again.
3)Try charging it with a different USB charger or USB port on your computer.
4)If your fitness tracker’s battery has been fully drained and left unused, it may take some time to start charging.
3.PAIR THE TRACKER
Turn on Bluetooth in your smartphone, open the H Band App and click to connect device, select Y39 to connect to your tracker. Please allow location access in your smartphone, when the tracker is connected with App, a sign of successful conncection will be displayed at the upper area on the screen of tracker.
Warm tips:
- Please connect your tracker to smartphone with the App ”H Band” via Bluetooth.
- Make sure that Bluetooth is turned on.
- Your tracker has sufficient charge.
- Your smartphone must be closed to tracker within 0.5m.
- If your smartphone can’t find the Y39, refresh the page in App by pulling down the page. Please turn on all permissions for H Band App in your smartphone settings.

Please make sure:
1. The latest version of H Band app has been installed on a supported smartphones of iOS 8.0 & Android 4.0 above, Bluetooth 4.0. Use the App to connect your tracker with your smartphone via Bluetooth.
2. The Bluetooth setting on your smartphone is ON, the distance between phone and tracker is within 0.5 m, your tracker is among the normal Bluetooth communication distance range (within 10 m ) after pairing finished;
3. Your zururu tracker’s battery isn’t critically low.
If the Bluetooth can not be connected, try to reboot mobile phone or re-start the Bluetooth and H Band app.One ZURURU fitness tracker can be connected to one smartphone only at a time, make sure your fitness tracker are not connecting with other smartphone, you can turn off the Bluetooth on other smartphone and pair again.
FAQ
Date and Time are set automatically when you pair your tracker to your smartphone during the set up process in the app.
To view your blood pressure on your tracker, scroll to the blood pressure page (by tapping the function button). Wait around 25 seconds for your blood pressure readings to appear on your tracker.
If you want to get the readings of BP each hour in the app, please switch the BP monitoring to automatic ( Y39 > Switch setting > BP automatic monitoring – enable)( It will use more battery power).
For calibration of your tracker and to get more accurate tracking result, please enable the BP private mode ( My device > Y39 >BP private mode ) in the App and enter your blood pressure value obtained from medical instrument.
Please be reminded that Zururu is not a medical device, it should not be used to diagnose, cure or treat a health problem or medical condition.
First you need to install the H Band app, enter your personal data including gender, height, weight, age, etc in the App and run through the set up process to pair it to your smartphone. If you walk less than 20 steps within a certain amount of time, these steps will not be stored. This is to help improve accuracy by filtering out movements other than steps, for example driving, typing on a keyboard or washing your hands.
Your tracker will automatically track how long and how well you sleep. Stats of sleep quality can be viewed in the app. Generally, you can read the stats 10-30 minutes after you wake up for data to synchronize with phone.
Open H Band App, Tap Mine > Settings > settings of main interface style. [VIDEO]
To view your heart rate, switch to the Heart Rate page. Wait around 2 seconds for your heart rate reading to appear. The beats per minute (BPM) figure will then update every 0.5 seconds. It may take 10-15 seconds for the readings to stabilize. Make sure the heart rate sensor is always in direct contact with your skin of wrist, your tracker should lay flat about one finger’s width away from your wrist bone.
It should be noted that automatic heart rate monitoring happens throughout the day by default. If desired, this option can be switched from automatic to manual-only readings from within the H Band app. This can also help to extend the amount of time between charging. To switch heart rate detection to manual, please set in the app: Mine > Y39 > Switch setting > HR automatic monitoring – turn off.
1. Make sure you have enabled the contacts permission in your smartphone.
2. Make sure you have enabled phone call permission in your smartphone.
3. Confirm that the call record permission is turned on in your smartphone.
( Set it in App: Mine>Help)
The warranty period is valid for one year from the date of purchase.
By registering your product, you allow customer service to apply your warranty in the event of a problem.
Free e-Books


NEED SUPPORT?